
Have you ever looked at a bag of specialty coffee and wondered how on earth the roaster found notes of “jasmine,” “blueberries,” or “toasted pecans” inside a roasted seed? It can feel like a secret language, or perhaps even a bit of marketing exaggeration. But there is a standardized, scientific method that professionals use to uncover these hidden flavors. It’s called Coffee Cupping.
Cupping is the universal language of the coffee world. From the high-altitude farms of Ethiopia to the industrial roasting labs in Europe, everyone cups the same way. The goal of cupping isn’t to make a “delicious” cup of coffee in the traditional sense; it is to create a level playing field where different beans can be compared side-by-side without the interference of different brewing methods.
Hosting a cupping at home is one of the most transformative experiences a coffee lover can have. It is the moment when you stop “drinking” coffee and start “tasting” it. It sharpens your palate, helps you identify what you truly like, and—most importantly—it’s a fantastic way to spend an afternoon with friends.
In this guide, we will break down the professional SCA (Specialty Coffee Association) cupping protocol into a fun, approachable home experience.
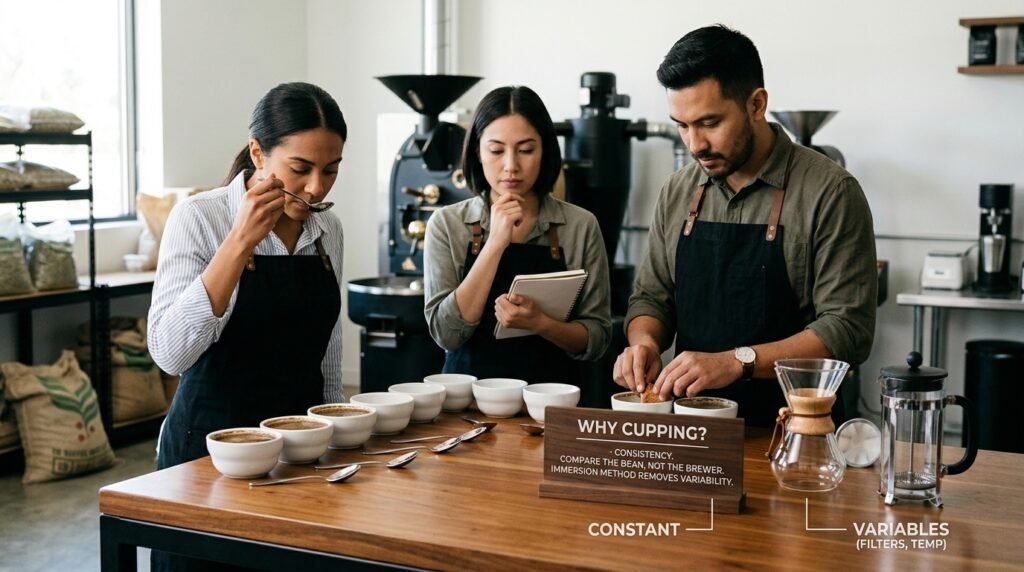
1. Why Cupping? The Science of Comparison
The reason we cup instead of just brewing five different V60s is consistency. If you brew one coffee in a French Press and another in a Pour-over, the different filters and temperatures will change the flavor. You won’t know if you like the bean or if you just like the brewer. Cupping uses a simple immersion method—much like a French Press but without the plunger—to ensure that the only variable changing is the coffee itself.
By removing the “technique” variable, you allow the Chemistry of Extraction: Balancing Acid, Sweet, and Bitter to happen naturally and uniformly across all samples. It is the purest way to evaluate the “terroir” and the roast quality.
2. Setting the Stage: What You Will Need
You don’t need a laboratory, but you do need a few specific items to keep the session organized.
-
Glass Cups or Bowls: Ideally, they should be the same size and shape (between 160ml and 220ml).
-
Cupping Spoons: Professional spoons are deep and silver-plated, but any large, deep soup spoon will work.
-
The Coffee: Choose 3 to 5 different coffees. Try to get a variety—perhaps a natural process Ethiopian, a washed Colombian, and a nutty Brazilian.
-
The Grinder: Consistency is key here. As we’ve established in The Grinder Manifesto: Why Your Grinder is More Important Than Your Brewer, you need a burr grinder that can produce a uniform medium-coarse grind (similar to sea salt).
-
Filtered Water: Since water is the solvent, its quality is paramount. Revisit our guide on Water Quality: The Invisible Ingredient in Your Coffee to ensure your water isn’t masking the delicate floral notes you’re trying to find.
-
Scale and Timer: Precision is what makes this a scientific process rather than a guessing game.
3. The Protocol: Step-by-Step
Step 1: The Dry Aroma (Fragrance)
Grind each coffee separately. The standard ratio is 8.25 grams of coffee for every 150ml of water. Place the dry grounds in the cups.
Before adding water, go around the table and smell the dry grounds. Tap the side of the cup to release the gases. What do you smell? Is it sweet like caramel? Nutty? Earthy? This is the first “clue” to the coffee’s identity.
Step 2: The Pour
Start your timer. Pour the hot water (about 93°C to 94°C) directly onto the grounds, filling the cup to the very brim. Make sure all the grounds are wet.
Now, you wait. Do not stir. Do not touch the cups. For the next 4 minutes, the coffee will undergo a natural “bloom.”
Step 3: Breaking the Crust
At the 4-minute mark, a “crust” of coffee grounds will have formed at the top of the cup. This is the most aromatic moment of the cupping.
Take your spoon and push the grounds back toward the edge of the cup three times. As you do this, put your nose right over the cup and inhale. This is called “breaking the crust.” The steam released here will give you the most intense scent of the coffee’s character.
Step 4: Cleaning the Surface
After breaking the crust, most of the grounds will sink to the bottom. Use two spoons to gently skim off the remaining foam and floating bits from the surface. You want a clean, clear liquid.
Step 5: The Slurp (The Evaluation)
Wait until the timer reaches 9 to 10 minutes. The coffee will still be warm, but not scorching.
Dip your spoon into the top of the liquid (don’t go too deep and disturb the grounds at the bottom). Now, the most important part: The Slurp. You want to draw the coffee into your mouth with a loud, aggressive “shhhhp” sound. The goal is to aerate the coffee, spraying it across your entire tongue and the back of your palate. This activates your “retro-nasal” olfaction—where your brain combines taste and smell to identify complex flavors.
4. What to Look For: The Five Pillars of Taste
As you go from cup to cup, try to categorize your thoughts into these five areas:
A. Acidity (The Brightness)
Does the coffee have a “zing”? Does it remind you of a lemon (citric), a green apple (malic), or a grape (tartaric)? High-altitude coffees often have a higher acidity that gives them a sparkling quality.
B. Sweetness
Even without sugar, good coffee is sweet. Is it a “white sugar” sweetness, a “honey” sweetness, or a “dark chocolate” bitterness?
C. Body (Mouthfeel)
How does the coffee feel on your tongue? Is it thin and tea-like? Or is it heavy, creamy, and buttery? This is often a result of the processing method (Natural vs. Washed).
D. Flavor (The Notes)
This is where you get specific. Don’t worry about being “wrong.” If a coffee reminds you of a specific cereal you had as a child, write that down. The “Flavor Wheel” is just a tool to help you find the words for what your brain is already detecting.
E. Aftertaste (The Finish)
Does the flavor disappear immediately, or does it linger? Is the lingering taste pleasant and sweet, or is it dry and astringent?
5. The Importance of Temperature Change
One of the most fascinating aspects of cupping is how the flavor changes as the coffee cools.
Hot coffee is difficult for the human tongue to process—the heat masks the acidity and the subtle sugars. As the cups reach room temperature (around 15 to 20 minutes into the session), the “true” nature of the coffee is revealed.
A high-quality specialty coffee will often taste better as it gets cooler. If a coffee becomes bitter or “flat” as it cools, it usually indicates a lower-quality bean or a roast defect. This is why we continue to taste and re-taste the cups for up to 30 minutes.

6. Cupping Etiquette and “The Slurp”
If you are hosting this for friends, remind them that there is no “wrong” answer in cupping. Everyone’s palate is built differently based on their culture, their diet, and their memories.
One rule of thumb: Don’t share your opinion until everyone has tasted everything. Taste is highly suggestive. If you say “Wow, this tastes like strawberries!” before your friend tries it, their brain will immediately start looking for strawberries, potentially missing the unique floral notes they would have found on their own.
Also, provide “spit cups.” In professional cuppings, tasters often spit out the coffee after evaluating it to avoid getting “over-caffeinated” (especially when tasting 20+ coffees). For a home session with 4 coffees, this might not be necessary, but it’s a good pro-tip to have!
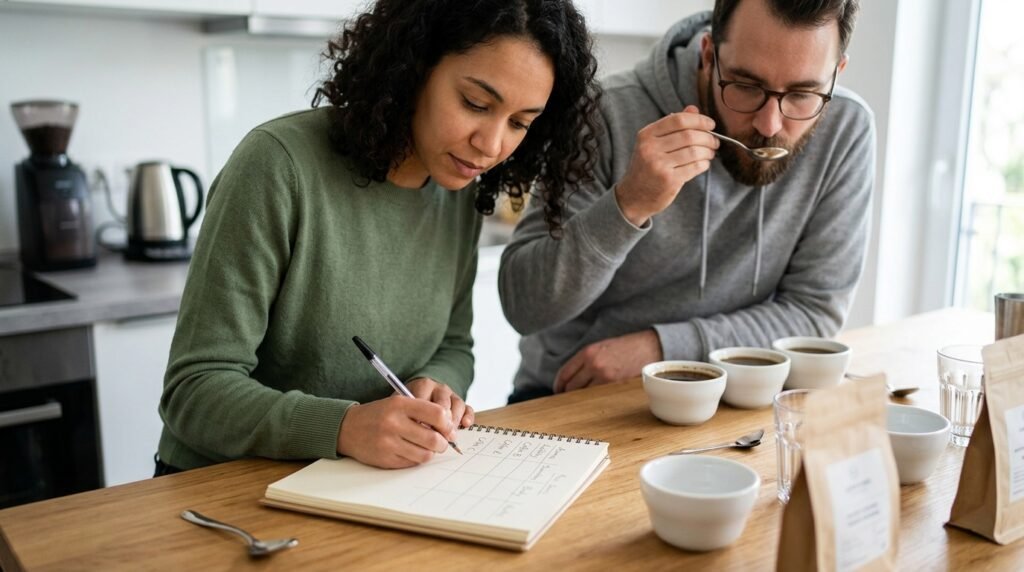
7. Recording Your Findings: The Cupping Sheet
You don’t need a formal SCA score sheet, but having a notebook is essential.
Draw a simple table. On the left, list the coffees (Coffee A, Coffee B, etc.). Across the top, list the categories: Aroma, Acidity, Sweetness, Body, and Notes.
By the end of the session, you will have a “map” of your preferences. You might discover that you consistently prefer “Washed” coffees from Central America over “Natural” coffees from Africa, or vice versa. This data is incredibly valuable the next time you are Decoding Labels to Find Your Perfect Beans.
8. Cleaning Up: Respecting the Equipment
Once the session is over, the clean-up is simple but important. Coffee grounds should never go down the sink—they are perfect for your garden or compost.
Rinse your spoons and cups thoroughly. If you used professional silver-plated spoons, avoid the dishwasher as it can tarnish the metal. Proper care ensures your tools are ready for the next “deep dive” into flavor.
Summary: The Home Cupping Checklist
| Phase | Goal | Key Action |
| Preparation | Consistency. | Use a scale; grind medium-coarse. |
| Dry Fragrance | Initial impressions. | Smell the grounds before adding water. |
| The Pour | Extraction. | Use 94°C filtered water; wait 4 mins. |
| The Break | Intense Aroma. | Push grounds back 3 times; inhale. |
| The Tasting | Evaluation. | Slurp aggressively; taste as it cools. |
Final Thoughts
Coffee cupping is the ultimate exercise in mindfulness. It forces you to slow down and listen to what the bean is telling you. It strips away the marketing, the beautiful packaging, and the fancy machines, leaving you with nothing but water and the seed of a tropical fruit.
When you host a cupping, you aren’t just drinking coffee; you are exploring geography and chemistry. You are connecting with the farmer who grew the beans and the roaster who spent hours perfecting the heat curve.
Most importantly, you are developing your own “voice” in the coffee world. You’ll find that your favorite coffee isn’t necessarily the most expensive one, but the one that resonates with your personal palate.
So, call a few friends, grab some spoons, and start slurping. The world of specialty coffee is much bigger than you think, and the best way to see it is through the bottom of a cupping bowl.
Happy tasting, and may your palate always be sharp!

Marcelo Clark combines professional industry experience with a passion for democratizing coffee knowledge. Specialist in extraction techniques and an advocate for single-origin beans, Marcelo uses this space to teach beginners how to appreciate the subtle notes of a well-crafted brew. His goal is to make learning about methods and origins simple, relevant, and inspiring for every reader’s daily routine.