
There is a specific kind of magic that happens in a specialty coffee shop. You watch the barista tilt a pitcher, a thin stream of white liquid disappears into the dark crema, and then—with a flick of the wrist—a perfect heart or a delicate rosetta blooms on the surface. It looks effortless. It looks like a dance.
Then, you go home to your own espresso machine. You try to recreate the movement, but instead of a heart, you end up with a white blob that looks more like a ghost or a cloud.
Latte art is one of the most frustrating and rewarding skills in the coffee world. It is the intersection of fluid dynamics, temperature control, and muscle memory. But here is the secret: latte art isn’t just about the “pour.” It is about the texture of the milk. If the milk isn’t right, the pour is impossible.
In this guide, we are going to break down the physics of microfoam, the ergonomics of the pitcher, and the three fundamental shapes that every home barista needs to master. Whether you are using a professional machine or a handheld frother, this is how you start painting with milk.
1. The Canvas: It Starts with the Espresso
Before you even touch the milk pitcher, you have to look at your espresso. The crema is your “canvas.” If the crema is too thin, the milk will simply dive under the surface and never reappear. If the crema is too bubbly or “broken,” the art will look grainy.
A perfect canvas requires a shot that is rich in oils and CO2. This is why The Science of the Bloom: Why Bubbles are the Key to Flavor Extraction is so important; the gas trapped in the coffee is what helps stabilize the foam on top.
If you find that your art is “sinking,” you might need to look at your beans. As we discussed in How to Choose the Best Coffee for Each Brewing Method, espresso-specific roasts (Medium to Medium-Dark) generally produce the thick, stable crema needed to support the weight of the milk.

2. The Science of “Wet Paint” Microfoam
The goal of steaming milk isn’t just to make it hot; it is to create microfoam. Microfoam is a suspension of tiny air bubbles trapped within the proteins and fats of the milk. When done correctly, it should look like wet, glossy white paint. It should not look like the dry, “bubble bath” foam of a 1990s cappuccino.
The Two Stages of Steaming:
-
Aeration (Stretching): This happens in the first few seconds. You keep the tip of the steam wand just at the surface of the milk to introduce air. You should hear a “paper tearing” sound. If it sounds like a screaming jet engine, the wand is too deep. If it sounds like big splashes, the wand is too high.
-
Texturing (Rolling): Once you have added the air, you submerge the wand slightly and tilt the pitcher to create a vortex (a whirlpool). This “rolls” the air into the milk, breaking big bubbles into microscopic ones.
The temperature limit is roughly 60°C to 65°C. Beyond that, the proteins break down, the sweetness vanishes, and the foam becomes unstable.
3. The Pitcher: Ergonomics and Control
You wouldn’t paint a masterpiece with a house-painting brush, and you can’t pour a rosetta with a soup ladle. The design of your milk pitcher (the “jug”) matters immensely.
-
The Spout: Beginners should look for a “pointed” spout. This provides a more controlled, thin stream of milk, making it easier to draw fine lines.
-
The Grip: Some baristas hold the handle; others “pinch” the body of the pitcher for more tactile control. Find what feels natural to you.
-
The Size: For a standard 8oz latte, use a 12oz (350ml) pitcher. You need enough “headspace” to create the vortex without the milk flying out of the jug.
[Image showing the “pencil grip” vs “handle grip” for milk pitchers]
4. The Pour: Understanding “Height” and “Flow”
Latte art is governed by the laws of physics—specifically, the velocity of the milk hitting the espresso.
-
High and Slow: When you start the pour, you hold the pitcher about 2–3 inches above the cup and pour a thin stream. The velocity carries the milk under the crema. This “fills” the cup without marking the surface.
-
Low and Fast: When the cup is about half full, you bring the spout of the pitcher as close to the surface of the liquid as possible and increase the flow rate. Because the spout is close, the milk loses its downward velocity and begins to “glide” across the top of the crema, creating white marks.
This transition from high-to-low is the “Aha!” moment for most beginners. If you stay high, you get no art. If you start low, you get a white mess.
5. The First Shape: The Heart
The Heart is the foundation of all latte art. If you can’t pour a heart, you can’t pour a tulip or a rosetta.
-
Fill the Base: Start high and slow, circling the cup to create a consistent brown base.
-
The Drop: When the cup is 70% full, bring the spout down to the center. Pour steadily into one spot. A white circle will start to form.
-
The “Strike Through”: When the cup is almost full, lift the pitcher back up (to “cut” the flow) and pull the thin stream of milk through the center of the circle. This pull-through is what drags the top of the circle down into the “V” shape of the heart.

6. The Second Shape: The Tulip
The Tulip is essentially a series of “stacked” hearts. It requires you to stop and start your pour with rhythm.
-
First Tier: Bring the spout down and create a small white circle. Stop pouring.
-
Second Tier: Push the spout into the back of the first circle and start pouring again. This “pushes” the first circle forward into a crescent shape.
-
The Finish: Repeat for a third or fourth tier, then do the “strike through” from the top to the bottom to connect all the layers.
This requires excellent control over The Mystery of Crema: What it Really Tells Us About Your Espresso; if your crema is too thin, the layers of the tulip will simply blend into each other.
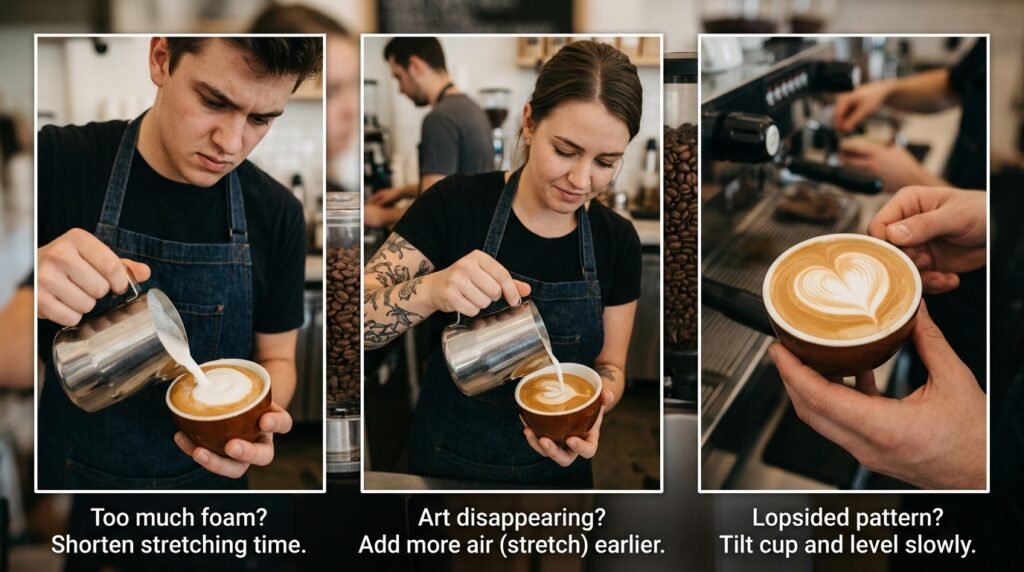
7. Troubleshooting: Why It Isn’t Working
If you are practicing and feeling discouraged, check these common errors:
-
The “Blob” Effect: Your milk is too thick. You aerated for too long. Next time, “tear the paper” for only 2–3 seconds, then focus on the rolling vortex.
-
The “Disappearing” Art: Your milk is too thin. You didn’t add enough air. Or, you are pouring from too high during the “art” phase.
-
The “Off-Center” Heart: You aren’t tilting the cup. You should tilt the cup toward the pitcher as you start the art, then slowly level it as the cup fills. This gives the milk more “room” to glide.
Pro Tip: Practice with water and a drop of dish soap in your pitcher. It mimics the texture of milk and allows you to practice your “vortex” without wasting gallons of expensive dairy.
8. Plant-Based Milks: The New Frontier
Steaming oat, almond, or soy milk is a completely different science.
-
Oat Milk: The “specialty” favorite. It has enough fats and proteins to mimic dairy closely. It usually requires slightly less aeration than cow’s milk.
-
Almond Milk: Very fragile. It separates easily if it gets too hot. Keep the temperature below 55°C for the best results.
-
Soy Milk: Can “curdle” when it hits acidic coffee. Look for “Barista Edition” versions that have added acidity regulators to prevent this reaction.
No matter the milk, the goal remains the same: glossy, fine-pored microfoam that reflects the light.
Summary: The Latte Art Cheat Sheet
| Step | Action | Visual Goal |
| Stage 1 | Aerate (Stretching) | 10%–20% increase in volume; “paper tearing” sound. |
| Stage 2 | Vortex (Rolling) | Glossy, “wet paint” texture; no visible bubbles. |
| Stage 3 | The Base | Pour from height; “incorporate” the milk. |
| Stage 4 | The Art | Spout touching the surface; “glide” the foam. |
| Stage 5 | The Cut | Lift and pull through; creates the symmetry. |
Final Thoughts
Latte art is a visual promise. It tells the person drinking the coffee that the milk was steamed with care, the espresso was pulled with precision, and the barista took a moment to create something beautiful.
But remember: a beautiful rosetta cannot save a bad cup of coffee. The art is the “cherry on top” of a well-executed extraction. Don’t get so caught up in the pour that you forget to check your grind or your water quality.
Be patient with yourself. Your first 100 hearts will probably look like onions. Your first 50 tulips will look like mushrooms. But one morning, the pitcher will feel light, the milk will glide perfectly, and you’ll realize you aren’t just making a drink—you’re making a masterpiece.
Happy pouring, and may your hearts always be symmetrical!

Marcelo Clark combines professional industry experience with a passion for democratizing coffee knowledge. Specialist in extraction techniques and an advocate for single-origin beans, Marcelo uses this space to teach beginners how to appreciate the subtle notes of a well-crafted brew. His goal is to make learning about methods and origins simple, relevant, and inspiring for every reader’s daily routine.