
I used to think that “coffee cupping” was something reserved for people in lab coats or professionals who spent their entire lives in roasting rooms. I would see photos of experts leaning over small bowls, slurping loudly from silver spoons, and taking intense notes in leather-bound journals. It looked intimidating, clinical, and, to be honest, a little bit snobbish.
But then, I attended my first informal cupping session, and my perspective shifted entirely. I realized that cupping isn’t about being an “expert”—it’s about being a student of your own palate. It is the most honest way to taste coffee because it removes the variables of different brewing methods. There are no paper filters to trap oils, no espresso machines to create pressure, and no fancy techniques to hide flaws.
It is just the coffee, the water, and you.
Hosting a cupping at home is one of the best ways to accelerate your coffee journey. It’s fun, it’s educational, and it’s a great way to share your passion with friends. Here is my complete, human-friendly guide to hosting your own coffee cupping at home without the intimidation factor.
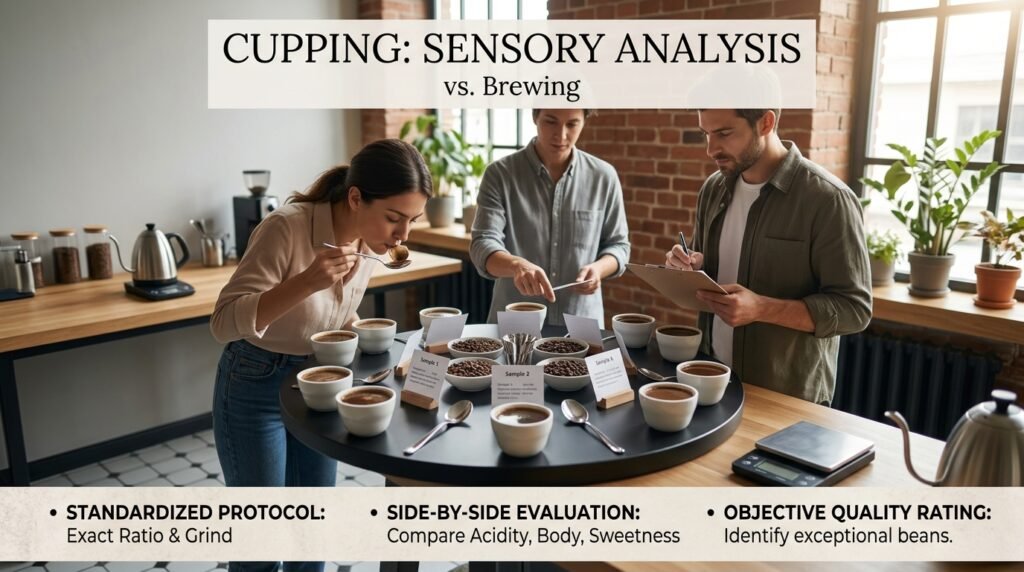
Why Cup Coffee Instead of Just Brewing It?
When you brew a pour-over or a French Press, you are making a drink. When you cup coffee, you are performing a sensory analysis.
The beauty of the cupping protocol (which is standardized by the Specialty Coffee Association) is its simplicity. By using the exact same ratio, grind size, and water temperature for every sample, you create a “level playing field.” This allows the unique characteristics of each bean to stand out.
You’ll find that How I Tell the Difference Between Cheap Coffee and Quality Coffee becomes incredibly obvious when you have four or five different samples side-by-side. You aren’t guessing anymore; the differences in acidity, body, and sweetness are right there in front of you.
What You’ll Need (The Non-Intimidating Kit)
You don’t need to spend a fortune on professional equipment. Most of what you need is likely already in your kitchen:
-
Uniform Small Bowls or Glasses: You’ll need 2 or 3 for each coffee you are tasting. They should be roughly 6 to 9 ounces (180ml to 250ml).
-
Cupping Spoons: Professional spoons are deep and silver-plated, but any large, deep soup spoon will work just fine.
-
A Timer: Your phone works perfectly.
-
A Scale: Precision is key here. You want to use the same amount of coffee and water for every bowl.
-
Hot Water: Filtered water is a must! As we discussed in our deep dive into Water Quality: The Invisible Ingredient in Your Coffee, if your water tastes like chlorine, your cupping will be a waste of time.
-
The Coffee: Aim for 3 to 5 different bags. Try to get a mix—maybe one Natural process, one Washed, and different roast levels.
Step 1: Setting the Stage
Start by cleaning your space. You don’t want the smell of last night’s dinner or a scented candle interfering with the delicate aromas of the coffee.
Place your bowls in a row. For each bowl, you’ll want to weigh out your coffee. The standard ratio is roughly 8.25 grams of coffee per 150ml of water. If you’re using an 8oz glass, about 12 to 13 grams of coffee is the sweet spot.
Grind your beans slightly coarser than you would for a pour-over—something like coarse sea salt. Make sure to purge your grinder between each coffee so you don’t have “leftover” grounds from a dark roast mixing into your light roast.
Step 2: The Dry Aroma (Fragrance)
Before you add a single drop of water, smell the dry grounds in each bowl. Give the bowl a little shake and put your nose right in there.
What do you smell? Is it nutty? Fruity? Does it remind you of a specific spice? This is the “Fragrance” stage. Take notes on which one smells the most intense and which one smells the most pleasant. This is where The Chemistry of the Roast: What Happens Inside the Bean really starts to show; a light roast might smell like tea, while a darker roast will immediately hit you with chocolate and smoke.
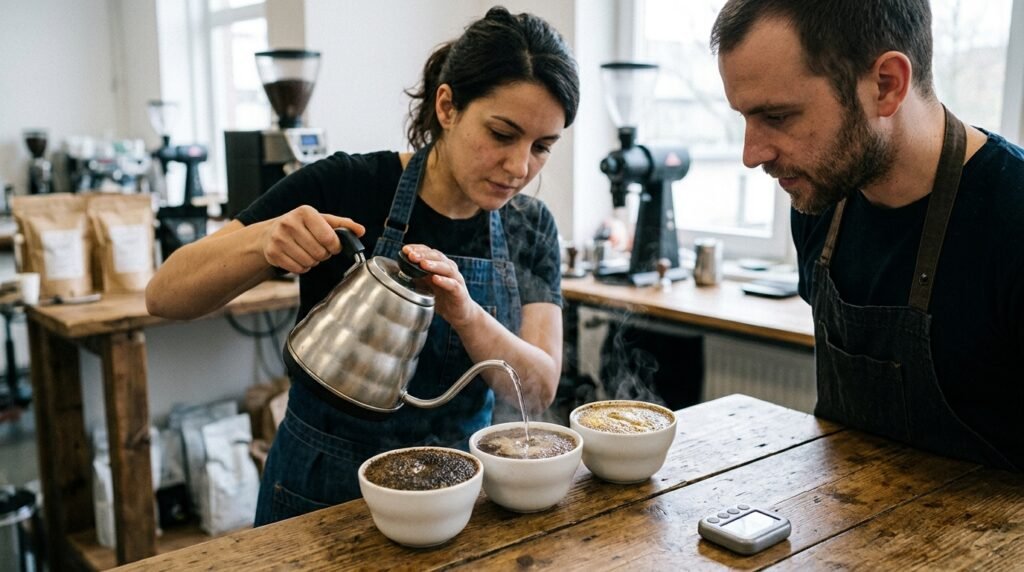
Step 3: The Pour and the Wait
Start your timer. Pour your hot water (around 93°C to 95°C) directly onto the grounds in each bowl, filling them all the way to the rim. Make sure all the grounds are saturated.
Now, you wait.
For the next four minutes, do not touch the bowls. You will see a “crust” of coffee grounds form on the surface. This crust traps the aromatics inside the liquid. Use this time to observe the colors. You’ll notice that some crusts look golden and oily, while others are dark and matte.
Step 4: Breaking the Crust
At the 4-minute mark, it’s time for the most aromatic part of the process: Breaking the Crust.
Take your spoon and gently push the floating grounds to the back of the bowl three times. While you do this, put your nose directly over the bowl. This is the “Aroma” stage. The steam that escapes when you break the crust contains the most concentrated aromatic compounds of the entire process.
After you’ve broken the crust on every bowl, use two spoons to gently skim off the remaining grounds and foam (the “crema”) from the surface. You want the top of the liquid to be as clear as possible.
Step 5: The Slurp (The Fun Part)
Now, we have to wait again. The coffee is currently too hot to taste accurately. Our taste buds are most sensitive when the liquid is between 50°C and 60°C. Wait until the timer hits 10 to 12 minutes.
When you’re ready, dip your spoon into the coffee and… slurp.
I mean a loud, aggressive slurp. The goal is to “atomize” the coffee—to spray it across your entire tongue and the back of your throat. This ensures that every taste bud is activated and that the retronasal aromatics are sent straight to your olfactory system.
Yes, you will look and sound ridiculous. That is part of the charm.
Step 6: Evaluation (The Three Rounds)
As the coffee cools, the flavor changes. A great cupping involves three rounds of tasting:
-
Round 1 (Hot): Focus on the Flavor and the Acidity. Is it bright? Is it flat?
-
Round 2 (Warm): Focus on the Body and the Balance. Does it feel heavy or light? Is the sweetness starting to come out?
-
Round 3 (Room Temperature): Focus on the Aftertaste. Does it leave a pleasant sweetness or a bitter dryness?
As we explored in The Science of Aftertaste: Why Great Coffee Lingers, the highest quality coffees will actually taste better as they reach room temperature. If a coffee becomes sour or “papery” as it cools, it’s a sign of lower quality.
Step 7: The “No-Wrong-Answers” Discussion
If you are cupping with friends, this is the best part. After everyone has tasted all the samples, start talking.
Don’t worry about using professional words like “effervescent” or “stone fruit.” Use your own language. If a coffee reminds you of your grandmother’s kitchen, say that. If it tastes like a specific brand of cereal or a candy bar you liked as a kid, say that.
The goal of cupping isn’t to guess what the roaster wrote on the bag; it’s to learn what you like. You might find that everyone in the room has a different favorite. That’s the beauty of coffee—it’s subjective.

Common Cupping Pitfalls (And How to Avoid Them)
-
Double-Dipping: If you are cupping with others, have a separate glass of hot water for each person to rinse their spoon between every sip. Hygiene is important!
-
Too Much Caffeine: It’s easy to accidentally consume the equivalent of five espressos during a cupping. Professional cuppers often spit the coffee into a cup after tasting it. If you’re doing this in the afternoon, you might want to consider the “spit cup” method.
-
Over-thinking: Don’t stare at the bag while you taste. In fact, many people prefer “Blind Cupping,” where they hide the bags so they aren’t biased by the price or the brand.
Summary: The Cupping Timeline
| Time | Action | What to Focus On |
| 0:00 | Pour Water | Ensuring all grounds are wet. |
| 0:00 – 4:00 | The Steep | Watching the crust form. |
| 4:00 | Break the Crust | The intense wet aroma. |
| 5:00 – 10:00 | Clean the Surface | Removing foam and floating bits. |
| 10:00 – 20:00 | The Tasting | Flavor, Body, and Aftertaste as it cools. |
Final Thoughts
Hosting a coffee cupping at home is like taking the blindfold off. Suddenly, you aren’t just drinking “coffee”; you are experiencing the work of a farmer in Ethiopia, a processor in Colombia, and a roaster in your local neighborhood.
It turns a daily habit into a mindful ritual. It teaches you to slow down, to breathe, and to pay attention to the incredible complexity hidden in such a small bean. Whether you do it once a week or once a year, cupping will fundamentally change your relationship with your morning cup.
So, gather some bowls, invite a few curious friends over, and start slurping. You’ll be amazed at what your palate can discover when you give it the chance to speak.
Happy cupping, and don’t be afraid to make some noise!

Marcelo Clark combines professional industry experience with a passion for democratizing coffee knowledge. Specialist in extraction techniques and an advocate for single-origin beans, Marcelo uses this space to teach beginners how to appreciate the subtle notes of a well-crafted brew. His goal is to make learning about methods and origins simple, relevant, and inspiring for every reader’s daily routine.